Cross-platform End-To-End Encryption (E2EE)
E2EE with attestation
E2EE is a type of communication security that ensures only the intended recipients can read the messages being sent and received. This example demonstrates how to integrate remote attestation validation into the E2EE establishment process using the Certifier Framework. Our example extends the framework’s sample application to demonstrate E2EE between x64 and arm64 platforms.
Components
This example consists of three main components:
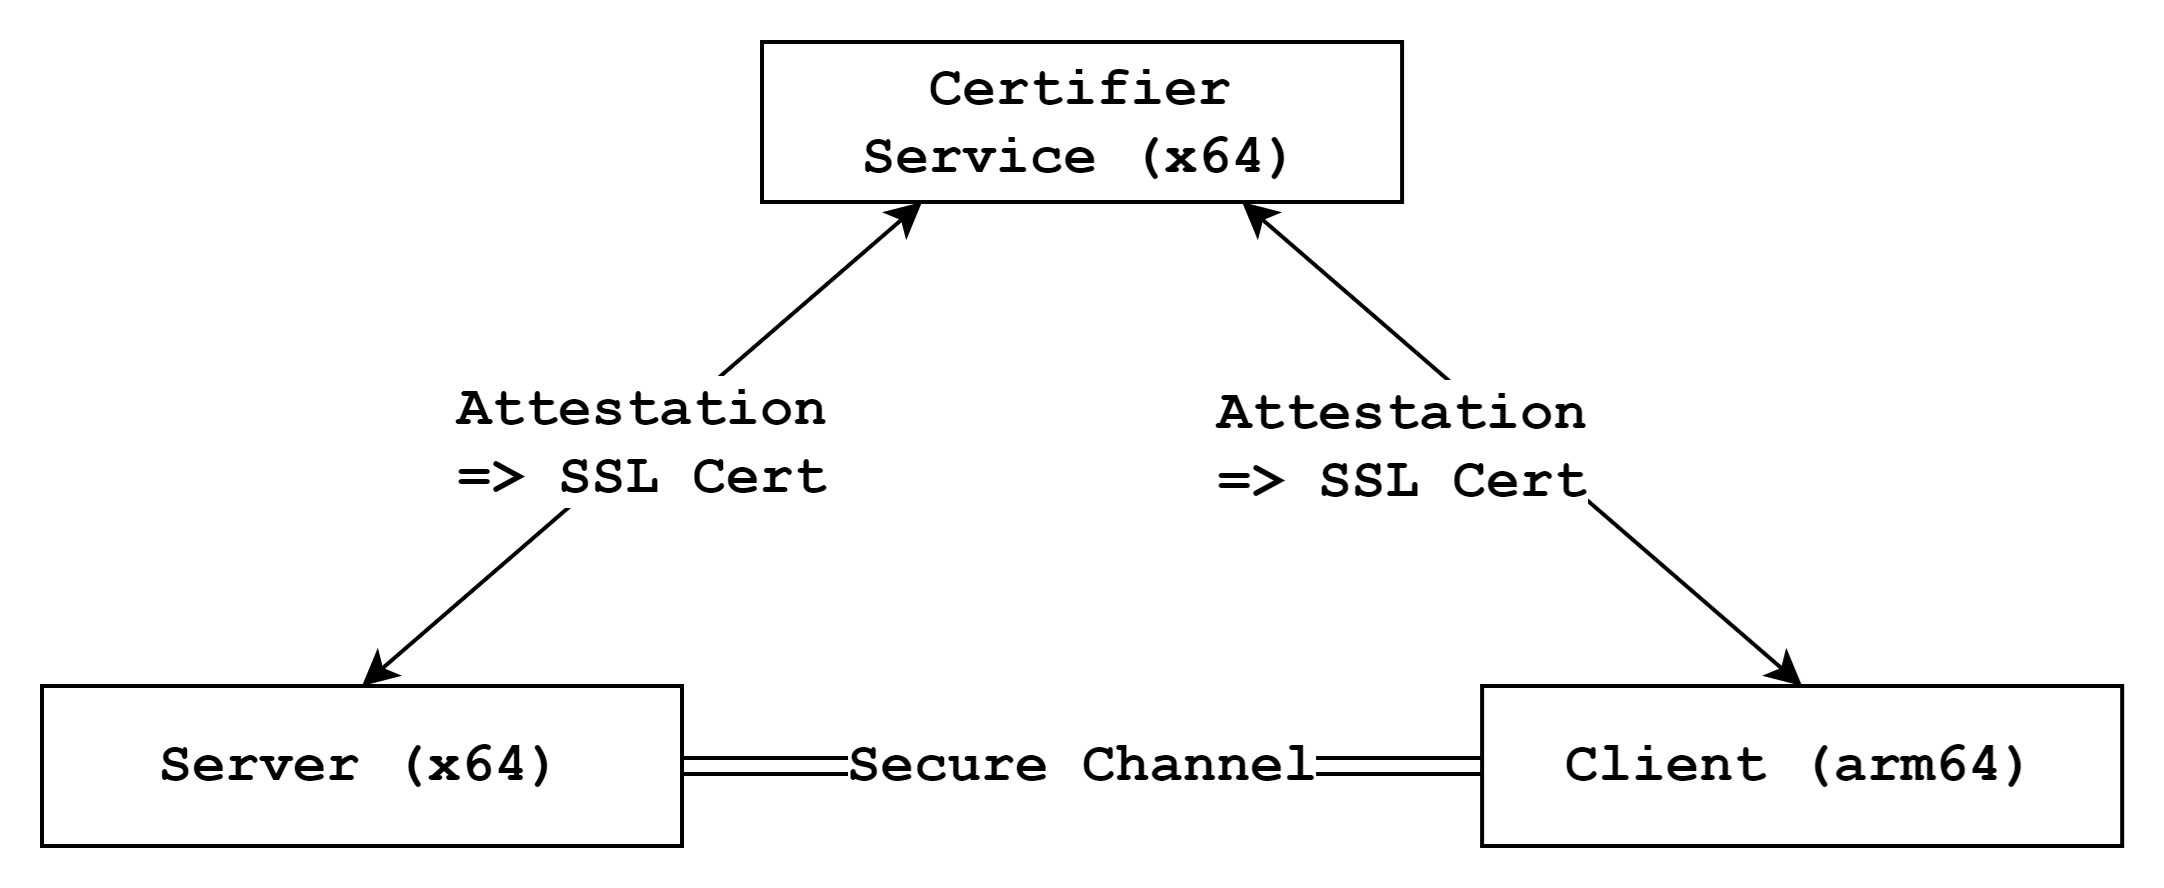
- Certifier Service: An x64 service responsible for performing attestation and checking against a pre-written policy
- E2EE Server App: An x64 application that requests attestation to the service and attempts to establish a secure channel with the client
- E2EE Client App: An arm64 application that requests attestation to the service and attempts to establish a secure channel with the server
Helper Scripts
We provide several helper scripts to simplify building and running the example:
- setup.sh: Installs required dependencies such as protobuf and gflags
- provisioning.sh: Configures the necessary measurements and policies for the service, server, and client
- build-{service, server, client}.sh: Builds each component separately
- run-{service, server, client}.sh: Starts each component separately
How to run this example
1. Install Dependencies
First, navigate to the examples directory and execute the setup script to install required dependencies:
$ cd $(islet)/examples/cross-platform-e2ee
$ ./setup.sh
2. Configure Measurements and Policies
Next, configure the necessary measurements and
policies by editing the provisioning.sh script and
specifying your own values for the following variables:
Those instructions are quoted from well-descripted document
You can get the server measurement with sdk on the host machine:
$ cd $(islet)/sdk
$ make run-simulated
Simulated attestation operation on x86_64.
...
Realm initial measurement: "580bd77074f789f34841ea9920579ff29a59b9452b606f73811132b31c689da9"
You also can get the client measurement with cli on the realm:
$ $(islet)/scripts/fvp-cca -nw=linux -rm=linux --hes
$ telnet localhost 5000
$ ./launch-realm.sh
# cd /shared
# insmod rsi.ko
# cd /shared/bin
# ./rsictl attest
[ 3477.026964] rsi: device rsi open
[ 3477.056437] rsi: ioctl: attestation_token
....
== Realm Token:
Realm initial measurement      (#44238) = [8a1d5cd26a0ee477067d18e2ff051687d18e1450b513508ba98910fa262b1fa3]
After getting measurments,
edit the script provisioning.sh.
# Set your measurements
SERVER_MEASUREMENT=580bd77074f789f34841ea9920579ff29a59b9452b606f73811132b31c689da9
CLIENT_MEASUREMENT=8a1d5cd26a0ee477067d18e2ff051687d18e1450b513508ba98910fa262b1fa3
Once you have edited the script, run it to generate the necessary keys and certificates:
$ ./provisioning.sh
...
...
3 blocks
1: Key[rsa, policyKey, b1a4dd71c6ea998df84b84689acb3b2eece897ca] says Key[rsa, policyAuthority, b1a4dd71c6ea998df84b84689acb3b2eece897ca] is-trusted-for-attestation
2: Key[rsa, policyKey, b1a4dd71c6ea998df84b84689acb3b2eece897ca] says Measurement[580bd77074f789f34841ea9920579ff29a59b9452b606f73811132b31c689da9]  is-trusted
3: Key[rsa, policyKey, b1a4dd71c6ea998df84b84689acb3b2eece897ca] says Measurement[491cf94bdb951308672a839776359d6ac22808bad2d318226ef0ea2979693e2e]  is-trusted
3. Run network enabled FVP
The client runs on the FVP, so you need to enable networking on FVP before starting the client. Follow these steps to do so: For more information about the network setting refer this.
$ cd $(islet)
$ ./scripts/fvp-cca --normal-world=linux-net --realm=linux --hes
Then, in the host Linux environment on FVP, launch the realm:
$ ./launch-realm.sh net
Finally, in the realm Linux environment on FVP, set the realm IP address and load the RSI kernel module:
You have to set current host machine time on realm linux. Because the service issues SSL certificates based host machine time to the server and the client
$ cd /shared
$ ./set-realm-ip.sh
$ date ${CURRENT_HOST_MACHINE_TIME} // ex) 122112002023
$ insmod rsi.ko
4. Build components
Now that you’ve configured everything, build the components using the provided build scripts:
// Compile the service
$ ./build-service.sh

// Compile the client
$ ./build-server.sh

// Cross-compile the client
$ ./build-client.sh
5. Run components
With all components built, you’re ready to start them:
Open three separate terminal windows or tabs. In the first window, start the certifier service:
$ ./run-service.sh
In the second window, start the server app:
$ ./run-server.sh
In the third window, switch to the /shared directory on FVP and start the client app:
$ cd /shared
$ ./run-client.sh
That’s it! Now you may see the server and client successfully establish an end-to-end encrypted connection.